分类目录归档:centos

TensorFlow与消息队列–服务器

消息队列(Message Queue,简称 MQ),可以将一些费时的任务放入队列,慢慢处理,改善客户端的体验。与TensorFlow服务结合,可以调高服务器的计算能力,将费时的数据传输与相对较快的预测计算分开来

一.数据流图

说明:
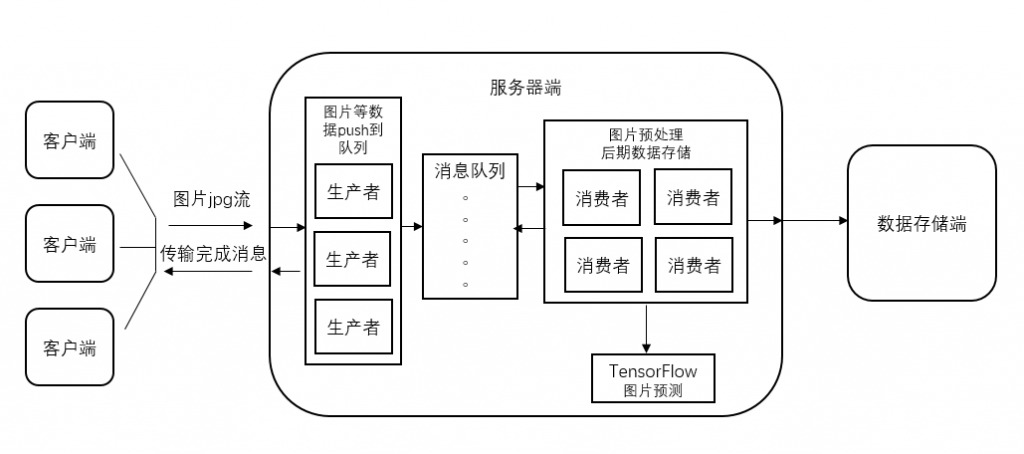
应用场景是收集客户端中的图片,进行分类处理,结果保留到服务器与数据库。客户端不需要实时知道图片的分类结果。如果客户端要知道实时结果,就不能这样设计。
该设计主要解决了2个问题,第一 加快了客户端上传图片的速度;第二 将图像预测的工作分离了出来,单独在GPU上运行,实现最大的效率。
详细流程:
1.客户端将图片通过HTTP协议post到“生产者”
2.“生产者”将收到的图片与其他信息打包发个消息队列
3.“消费者”拿到消息后,先解包,再进行图片预处理,随后将图片张量(数值)发个tensorflow搭建的服务进行分类。
4“消费者”收到结果后,保存结果数据。

继续阅读

centos7 安装 nginx php7

1.安装epel源

yum install epel-release

2.安装nginx

yum install nginx

3.add php7 repository

rpm -Uvh https://mirror.webtatic.com/yum/e17/webtatic-release.rpm

4.安装php7

根据需要添加删除

yum install php70w-fpm php70w-cli php70w-gd php70w-mcrypt php70w-mysql php70w-pear php70w-xml php70w-mbstring php70w-pdo php70w-json php70w-pecl-apcu php70w-pecl-apcu-devel

5配置PHP7

vi /etc/php-fpm.d/www.conf

修改

user = nginx

group = nginx

设置session

mkdir -p /var/lib/php/session

chown nginx:nginx -R /var/lib/php/session/

设置自动启动

sudo systemctl start php-fpm

sudo systemctl start nginx

sudo systemctl enable php-fpm

sudo systemctl enable nginx

6.安装MariaDB

yum install mariadb mariadb-server

自启动&配置

systemctl start mariadb

systemctl enable mariadb

mysql_secure_installation

7.配置nginx

vi /etc/nginx/conf.d/default.conf

添加

server {
    listen       80;
    server_name  server_domain_name_or_IP;

    # note that these lines are originally from the "location /" block
    root   /usr/share/nginx/html;
    index index.php index.html index.htm;

    location / {
        try_files $uri $uri/ =404;
    }
    error_page 404 /404.html;
    error_page 500 502 503 504 /50x.html;
    location = /50x.html {
        root /usr/share/nginx/html;
    }

    location ~ \.php$ {
        try_files $uri =404;
        #fastcgi_pass unix:/var/run/php-fpm/php-fpm.sock;
        fastcgi_pass 127.0.0.1:9000;
        fastcgi_index index.php;
        fastcgi_param SCRIPT_FILENAME $document_root$fastcgi_script_name;
        include fastcgi_params;
    }
}


测试


CentOS7 无用户共享文件夹配置

1.关闭SELinux

vi /etc/selinux/config

将SELINUX=enforcing 改为SELINUX=disabled(需重启机器)

2.安装samba

yum install samba samba-client

3.配置共享访问

编辑 /etc/samba/smb.conf

在[global]中添加:

security = user

map to guest = Bad User

#允许guest用户

guest account = administrator

#guest映射为系统某一账户

4.配置共享文件夹

[RDP]
comment = RDP_Defect
path = /home/administrator/RDP_Defect
valid users = administrator
writable = yes
available = yes
public = yes
case sensitive = auto
preserve case = Yes
short preserve case = Yes#设置可以修改的账户(global中的账户),并设置大小写不敏感

5.设置启动

启动  systemctl start smb

开机启动  systemctl enable smb

Centos7 配置远程桌面

参考文章 http://www.itzgeek.com/how-tos/linux/centos-how-tos/install-xrdp-on-centos-7-rhel-7.html

1.安装CentOS7的桌面环境 install Gnome on CentOS 7(Gnome)

2.Install EPEL and nux Desktop repository rpms.

rpm -ivh https://dl.fedoraproject.org/pub/epel/7/x86_64/e/epel-release-7-8.noarch.rpm

rpm -ivh http://li.nux.ro/download/nux/dextop/el7/x86_64/nux-dextop-release-0-5.el7.nux.noarch.rpm

具体的源文件新版本号可以在网站列表中找到

3.安装

yum -y install xrdp tigervnc-server

执行前可以先执行一下 yum update

4.安装Keyboard

教程是Japanese的,可以根据实际修改

cd /etc/xrdp

wget http://www.mail-archive.com/xrdp-devel@lists.sourceforge.net/msg00263/km-e0010411.ini

cp km-e0010411.ini km-0411.ini

cp km-e0010411.ini km-e0200411.ini

cp km-e0010411.ini km-e0210411.ini

5.启动

systemctl start xrdp.service

6.设置防火墙

防火墙打开3389/tcp端口

7.设置自启动

systemctl enable xrdp.service


Centos6.5 更新php5.4

1.首页安装Webtatic EL6 YUM源
rpm -Uvh http://repo.webtatic.com/yum/el6/latest.rpm

2.停止web服务器
service nginx stop

3.删除当前的 php 安装 php5.4
yum remove php*
yum install php54w
yum install php54w-fpm php54w-mysql php54w-gd php54w-imap php54w-ldap php54w-odbc php54w-pear php54w-xml php54w-xmlrpc php54w-mbstring php54w-mcrypt php54w-bcmath php54w-mhash

4.配置php-fpm
vi /etc/php-fpm.d/www.conf #编辑
user = nginx #修改用户为需要的
group = nginx #修改组为需要的
:wq #保存退出

5.重启web服务器
service php-fpm restart
service nginx start

6.查看php版本
php -v
PHP 5.4.33 (cli) (built: Sep 19 2014 19:58:27)
Copyright (c) 1997-2014 The PHP Group
Zend Engine v2.4.0, Copyright (c) 1998-2014 Zend Technologies

Nginx支持wordpress固定链接

官方给出了新的开启wordpress固定链接的方法,也简单的多。这里假设,我在nginx的conf文件夹下创建个wordpress.conf ,将下面的代码粘贴进去:

location / {
try_files $uri $uri/ /index.php?$args;
}
rewrite /wp-admin$ $scheme://$host$uri/ permanent;

搞定

(转载)CentOS设置程序开机自启动的方法

在CentOS或者RedHat其他系统下,如果是后面安装的服务,如httpd、mysqld、postfix等,安装后系统默认不会自动启动的。就算手动执行/etc/init.d/mysqld start启动了服务,只要服务器重启后,系统仍然不会自动启动服务。

在这个时候,我们就需要在安装后做个设置,让系统自动启动这些服务,避免不必要的损失和麻烦。

其实命令很简单的,使用chkconfig即可。比如要将mysqld设置为开机自动启动:

#chkconfig mysqld on

同理,要取消掉某个服务自动启动,只需要将最后的参数“on”变更为“Off”即可。比如要取消postfix的自动启动:

#chkconfig postfix off

值得注意的是,如果这个服务尚未被添加到chkconfig列表中,则现需要使用–add参数将其添加进去:

#chkconfig –add postfix

如果要查询当前所有自动启动的服务,可以输入:

#chkconfig –list

但是这样显示东西太多了,看起来很晕。如果只想看指定的服务怎么办呢?这个时候只需要在“–list”之后加上服务名就好了,比如查看httpd服务是否为自动启动,就输入:

#chkconfig –list httpd

这个时候输出的结果:

httpd 0:off 1:off 2:off 3:off 4:off 5:off 6:off

此时0~6均为off,则说明httpd服务不会在系统启动的时候自动启动。我们输入chkconfig httpd on后,再次检查输出结果变为:

httpd 0:off 1:off 2:on 3:on 4:on 5:on 6:off

这个时候2~5都是on,就表明会自动启动了。


#让httpd 在机器启动的时候在运行级别上停止

[root@zhangxx etc]# chkconfig –level 345 httpd off

[root@zhangxx etc]# chkconfig –list |grep httpd

httpd 0:关闭 1:关闭 2:关闭 3:关闭 4:关闭 5:关闭 6:关闭


#让httpd 在机器启动的时候在运行级别上启动

[root@zhangxx etc]# chkconfig –level 345 httpd on

[root@zhangxx etc]# chkconfig –list |grep httpd

httpd 0:关闭 1:关闭 2:关闭 3:启用 4:启用 5:启用 6:关闭


可用 ps -ef 來查看有什么程序在运行中.

删除服务

rm /etc/init.d/servername

—————————————————————————————-

1、把写好的启动脚本添加到目录/etc/rc.d/init.d/,然后使用命令chkconfig设置开机启动。
例如:我们把httpd的脚本写好后放进/etc/rc.d/init.d/目录,使用

  1. chkconfig –add httpd
  2. chkconfig httpd on

命令即设置好了开机启动。

——————————————————————————————

chkconfig命令

功能说明:检查、设定系统的各种服务。

语法:chkconfig [–add][–del][–list][系统服务]或
chkconfig [–level<等级代号>][系统服务][on/off/reset]

补充说明:这个是redhat公司遵循gpl规则所开发的程序,它可以查询操作系统在每一个执行等级(runlevel)中,会执行哪些系统服务,其中包括各种daemon。

linux os 将操作环境分为以下7个等级:
0:开机(请不要切换到此等级)
1:单人使用者模式的文字界面
2:多人使用者模式的文字界面,不具有网络档案系统(NFS)功能
3:多人使用者模式的文字界面,具有网络档案系统(NFS)功能
4:某些发行版的linux使用此等级进入x windows system
5:某些发行版的linux使用此等级进入x windows system
6:重新启动

参数:    –add   新增所指定的系统服务
–del 删除所指定的系统服务
–level 指定该系统服务要在哪个执行等级中开启或关闭
–list   列出当前可从chkconfig指令管理的所有系统服务和等级代号
on/off/reset   在指定的执行登记,开启/关闭/重置该系统服务

chkconfig命令主要用来更新(启动或停止)和查询系统服务的运行级信息。谨记chkconfig不是立即自动禁止或激活一个服务,它只是简单的改变了符号连接。

语法:

chkconfig –list [name]
chkconfig –add name
chkconfig –del name
chkconfig [–level levels] name <on|off|reset>
chkconfig [–level levels] name

chkconfig 没有参数运行时,显示用法。如果加上服务名,那么就检查这个服务是否在当前运行级启动。如果是,返回true,否则返回false。如果在服务名后面指定 了on,off或者reset,那么chkconfi 会改变指定服务的启动信息。on和off分别指服务被启动和停止,reset指重置服务的启动信息,无论有问题的初始化脚本指定了什么。on和off开 关,系统默认只对运行级3,4,5有效,但是reset可以对所有运行级有效。

–level选项可以指定要查看的运行级而不一定是当前运行级。

需要说明的是,对于每个运行级,只能有一个启动脚本或者停止脚本。当切换运行级时,init不会重新启动已经启动的服务,也不会再次去停止已经停止的服务。

chkconfig –list :显示所有运行级系统服务的运行状态信息(on或off)。如果指定了name,那么只显示指定的服务在不同运行级的状态。

chkconfig –add name:增加一项新的服务。chkconfig确保每个运行级有一项启动(S)或者杀死(K)入口。如有缺少,则会从缺省的init脚本自动建立。

chkconfig –del name:删除服务,并把相关符号连接从/etc/rc[0-6].d删除。

chkconfig [–level levels] name <on|off|reset>:设置某一服务在指定的运行级是被启动,停止还是重置。例如,要在3,4,5运行级停止nfs服务,则命令如下:

chkconfig –level 345 nfs off

运行级文件:

每个被chkconfig管理的服务需要在对应的init.d下的脚本加上两行或者更多行的注释。第一行告诉chkconfig缺省启动的运行级以及启动 和停止的优先级。如果某服务缺省不在任何运行级启动,那么使用 – 代替运行级。第二行对服务进行描述,可以用/ 跨行注释。
例如,random.init包含三行:
# chkconfig: 2345 20 80
# description: Saves and restores system entropy pool for /
# higher quality random number generation.

附加介绍一下Linux系统的运行级的概念:
Linux中有多种运行级,常见的就是多用户的2,3,4,5 ,很多人知道5是运行X-Windows的级别,而0就是关机了。运行级的改变可以通过init命令来切换。例如,假设你要维护系统进入单用户状态,那 么,可以使用init1来切换。在Linux的运行级的切换过程中,系统会自动寻找对应运行级的目录/etc/rc[0-6].d下的K和S开头的文件, 按后面的数字顺序,执行这些脚本。对这些脚本的维护,是很繁琐的一件事情,Linux提供了chkconfig命令用来更新和查询不同运行级上的系统服 务。

范例:

1.查看在各种不同的执行等级中,各项服务的状况:
$chkconfig –list

2.列出系统服务vsftpd在各个执行等级的启动情况:
$chkconfig –list vsftpd

3.在执行等级3,5时,关闭vsftpd系统服务:
$chkconfig –level 35 vsftpd off

4.在执行等级2,3,5时,开启 vsftpd系统服务:
$chkconfig –level 235 vsftpd on

5.关闭一些自己不需要的服务 ->
如果没有打印机:
chkconfig –level 235 cups off
如果没有局域网:
chkconfig –level 235 smb off
如果不需要远程用户登录的:
chkconfig –level 235 sshd off
如果不需要定时任务的:
chkconfig –level 235 crond off
如果不需要添加新硬件的:
chkconfig –level 235 kudzu off

有些时候我们需要在服务器里设置一个脚本,让他一开机就自己启动。方法如下:

cd /etc/init.d
vi youshell.sh   #将youshell.sh修改为你自己的脚本名

编写自己的脚本后保存退出。
在编写脚本的时候,请先加入以下注释

#add for chkconfig
#chkconfig: 2345 70 30
#description: the description of the shell   #关于脚本的简短描述
#processname: servicename                    #第一个进程名,后边设置自启动的时候会用到

说明:
2345是指脚本的运行级别,即在2345这4种模式下都可以运行,234都是文本界面,5就是图形界面X
70是指脚本将来的启动顺序号,如果别的程序的启动顺序号比70小(比如44、45),则脚本需要等这些程序都启动以后才启动。
30是指系统关闭时,脚本的停止顺序号。

给脚本添加上可执行权限:

chmod +x youshell.sh

利用chkconfig命令将脚本设置为自启动

chkconfig --add servicename

这样你的脚本就可以在开机后自动运行了。

另外,在redhat里也可以使用这个方法来实现开机自启动。

chkconfig的使用方法

chkconfig(check config)

功能说明:检查,设置系统的各种服务。

语  法:chkconfig

[–add][–del][–list][系统服务]或chkconfig[–level<等级代号>][系统服务][on/off/reset]

补充说明:这是RedHat公司遵循GPL规则所开发的程序,它可查询操作系统在每一个执行等级中会执行哪些系统服务,其中包括各类常驻服务。

参数:

–add 增加所指定的系统服务,让chkconfig指令得以管理它,并同时在系统启动的叙述文件内增加相关数据。
–del 删除所指定的系统服务,不再由chkconfig指令管理,并同时在系统启动的叙述文件内删除相关数据。
–level<等级代号> 指定读系统服务要在哪一个执行等级中开启或关毕

1:chkconfig 命令也可以用来激活和解除服务。chkconfig –list 命令显示系统服务列表,以及这些服务在运行级别0到6中已被启动(on)还是停止(off)。

chkconfig –list

chkconfig –list httpd

httpd 0:off 1:off 2:on 3:on 4:on 5:on 6:off

2:chkconfig 还能用来设置某一服务在某一指定的运行级别内被启动还是被停运。譬如,要在运行级别3、4、5中停运 nscd 服务,使用下面的命令:

chkconfig –level 345 nscd off

3:由 xinetd 管理的服务会立即被 chkconfig 影响。譬如,如果 xinetd 在运行,finger 被禁用,那么执行了 chkconfig finger on 命令后,finger 就不必手工地重新启动 xinetd 来立即被启用。对其它服务的改变在使用 chkconfig 之后不会立即生效。必须使用service servicename start/stop/restart命令来重起服务


第二种方法

编辑  /etc/rc.d/rc.local文件

格式为  程序名  程序路径

例如  a.sh  /home/a.sh

[转载]CentOS 6.4安装配置LNMP服务器(Nginx+PHP+MySQL)

准备篇

1、配置防火墙,开启80端口、3306端口
vi /etc/sysconfig/iptables
-A INPUT -m state –state NEW -m tcp -p tcp –dport 80 -j ACCEPT #允许80端口通过防火墙
-A INPUT -m state –state NEW -m tcp -p tcp –dport 3306 -j ACCEPT #允许3306端口通过防火墙

备注:很多网友把这两条规则添加到防火墙配置的最后一行,导致防火墙启动失败,

正确的应该是添加到默认的22端口这条规则的下面

如下所示:
################################ 添加好之后防火墙规则如下所示################################
# Firewall configuration written by system-config-firewall
# Manual customization of this file is not recommended.
*filter
:INPUT ACCEPT [0:0]
:FORWARD ACCEPT [0:0]
:OUTPUT ACCEPT [0:0]
-A INPUT -m state –state ESTABLISHED,RELATED -j ACCEPT
-A INPUT -p icmp -j ACCEPT
-A INPUT -i lo -j ACCEPT
-A INPUT -m state –state NEW -m tcp -p tcp –dport 22 -j ACCEPT
-A INPUT -m state –state NEW -m tcp -p tcp –dport 80 -j ACCEPT
-A INPUT -m state –state NEW -m tcp -p tcp –dport 3306 -j ACCEPT
-A INPUT -j REJECT –reject-with icmp-host-prohibited
-A FORWARD -j REJECT –reject-with icmp-host-prohibited
COMMIT
#######################################################################################
/etc/init.d/iptables restart #最后重启防火墙使配置生效

2、关闭SELINUX
vi /etc/selinux/config
#SELINUX=enforcing #注释掉
#SELINUXTYPE=targeted #注释掉
SELINUX=disabled #增加
:wq #保存退出
shutdown -r now #重启系统

3、安装第三方yum源

yum install wget #安装下载工具

1950

wget http://www.atomicorp.com/installers/atomic #下载

1951

sh ./atomic #安装

1953

yum check-update #更新yum源

1954

安装篇

一、安装nginx

yum remove httpd* php* #删除系统自带的软件包

1955

yum install nginx #安装nginx 根据提示输入y进行安装

chkconfig nginx on #设置nginx开机启动

service nginx start #启动nginx

二、安装MySQL

1、安装MySQL

yum install mysql mysql-server #输入Y即可自动安装,直到安装完成

1956

/etc/init.d/mysqld start #启动MySQL

1957

chkconfig mysqld on #设为开机启动

cp /usr/share/mysql/my-medium.cnf /etc/my.cnf #拷贝配置文件(注意:如果/etc目录下面默认有一个my.cnf,直接覆盖即可)

2、为root账户设置密码

mysql_secure_installation

#回车,根据提示输入Y,输入2次密码,回车,根据提示一路输入Y,最后出现:Thanks for using MySQL!

1958

1959

MySql密码设置完成,重新启动 MySQL:

/etc/init.d/mysqld restart #重启

/etc/init.d/mysqld stop #停止

/etc/init.d/mysqld start #启动

三、安装PHP5

1、安装PHP5

1960

yum install php php-fpm #根据提示输入Y直到安装完成

2、安装PHP组件,使 PHP5 支持 MySQL

1961

yum install php-mysql php-gd libjpeg* php-imap php-ldap php-odbc php-pear php-xml php-xmlrpc php-mbstring php-mcrypt php-bcmath php-mhash libmcrypt

#这里选择以上安装包进行安装,根据提示输入Y回车

chkconfig php-fpm on #设置php-fpm开机启动

/etc/init.d/php-fpm start #启动php-fpm

配置篇

一、配置nginx支持php
cp /etc/nginx/nginx.conf /etc/nginx/nginx.confbak#备份原有配置文件
vi /etc/nginx/nginx.conf #编辑
user nginx nginx; #修改nginx运行账号为:nginx组的nginx用户
:wq #保存退出
cp /etc/nginx/conf.d/default.conf /etc/nginx/conf.d/default.confbak #备份原有配置文件
vi /etc/nginx/conf.d/default.conf #编辑

index index.php index.html index.htm; #增加index.php

# pass the PHP scripts to FastCGI server listening on 127.0.0.1:9000
#
location ~ \.php$ {
root html;
fastcgi_pass 127.0.0.1:9000;
fastcgi_index index.php;
fastcgi_param SCRIPT_FILENAME $document_root$fastcgi_script_name;
include fastcgi_params;
}
#取消FastCGI server部分location的注释,并要注意fastcgi_param行的参数,改为$document_root$fastcgi_script_name,或者使用绝对路径
service nginx restart #重启nginx

二、php配置
vi /etc/php.ini #编辑
date.timezone = PRC #在946行 把前面的分号去掉,改为date.timezone = PRC
disable_functions =

passthru,exec,system,chroot,scandir,chgrp,chown,shell_exec,proc_open,proc_get_status,ini_alter,ini_alter,ini_restore,dl,ope

nlog,syslog,readlink,symlink,popepassthru,stream_socket_server,escapeshellcmd,dll,popen,disk_free_space,checkdnsrr,checkdns

rr,getservbyname,getservbyport,disk_total_space,posix_ctermid,posix_get_last_error,posix_getcwd,

posix_getegid,posix_geteuid,posix_getgid,

posix_getgrgid,posix_getgrnam,posix_getgroups,posix_getlogin,posix_getpgid,posix_getpgrp,posix_getpid,

posix_getppid,posix_getpwnam,posix_getpwuid, posix_getrlimit, posix_getsid,posix_getuid,posix_isatty,

posix_kill,posix_mkfifo,posix_setegid,posix_seteuid,posix_setgid,

posix_setpgid,posix_setsid,posix_setuid,posix_strerror,posix_times,posix_ttyname,posix_uname
#在386行 列出PHP可以禁用的函数,如果某些程序需要用到这个函数,可以删除,取消禁用。
expose_php = Off #在432行 禁止显示php版本的信息
magic_quotes_gpc = On #在745行 打开magic_quotes_gpc来防止SQL注入
short_open_tag = ON #在229行支持php短标签
open_basedir = .:/tmp/ #在380行 设置表示允许访问当前目录(即PHP脚本文件所在之目录)和/tmp/目录,可以防止php木马跨站,如果改了之后安装程序有问题(例如:织梦内容管理系统),可以注销此行,或者直接写上程序的目录/data/www.osyunwei.com/:/tmp/
:wq! #保存退出

三、配置php-fpm
cp /etc/php-fpm.d/www.conf /etc/php-fpm.d/www.confbak #备份原有配置文件
vi /etc/php-fpm.d/www.conf #编辑
user = nginx #修改用户为nginx
group = nginx #修改组为nginx
:wq #保存退出

测试篇

cd /usr/share/nginx/html

vi index.php #添加以下代码
<?php
phpinfo();
?>

:wq! #保存退出

chown nginx.nginx /usr/share/nginx/html -R #设置权限

chmod 775 /usr/share/nginx/html -R #设置可编辑运行权限(#添加)

service nginx restart #重启nginx

service php-fpm restart #重启php-fpm

1962

在客户端浏览器输入服务器IP地址,可以看到相关的配置信息!

说明lnmp配置成功!

1963


至此,CnetOS 6.4安装配置LNMP(Nginx+PHP+MySQL)教程完成。