Yolov5是比较常见的机器学习模型,速度也很快,使用GPU几毫秒内就可以完成推理预测。但这就是其极限速度吗?github上Yolov5的介绍里,小模型可以跑到1ms以内,我尝试了一下,最小的模型,小图片都要3~4毫秒。后来发现要用到TensorRT速度才可以更快。下面就看看TensorRT的代码怎么写。
一.生成yolov5模型
训练生成的方法参考github上的方法进行 https://github.com/ultralytics/yolov5 。记住使用了什么大小的yolo模型和是目标识别 还是图片分类,这些后面会用到。
二.生成TensorRt可以调用的模型
生成方法参考了github上的tensorrtx项目 https://github.com/wang-xinyu/tensorrtx 。
1.生成wts文件
对应的python代码位置 https://github.com/wang-xinyu/tensorrtx/blob/master/yolov5/gen_wts.py
假如你是图片分类的模型,yolo训练出的模型是 best.pt,则生成wts的命令为
python gen_wts.py -w best.pt -o broken.wts -t cls-w 输入的模型名字
-o 输出的模型名字
-t 模型类型 cls代表图片分类
2.将wts文件转换为engine文件,并导入运行。
根据我自己的理解TensorRT速度快的原因是将模型直接编译成了显卡可以直接运算的机器码,因此不同型号的显卡使用的机器码模型文件是不同的,需要特别生成。
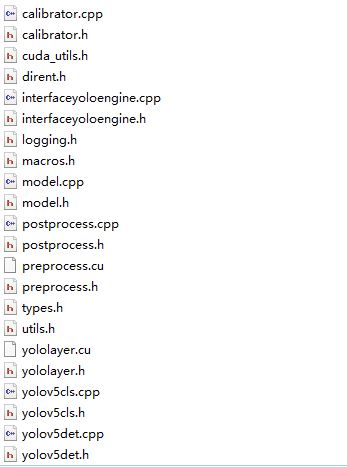
github上的tensorrtx项目虽然有c++的实现代码,但没有采用c++类的写法,而且有许多公共变量,不方便同一个程序,调用不同类型 不同大小的模型文件。因此进行了部分改写。文件结构如下图

全部文件打包在如下压缩包里面
生成模型的使用方法如下:
#include "yolov5det.h"
#include "yolov5cls.h"

int main(int argc, char** argv) {
    yolov5det _yolov5det;
    yolov5cls _yolov5cls;

    string outputfilename = "best.engine";//输出
    string engine = std::string("best.wts");//输入
    _yolov5det.createngine(engine,outputfilename,'s');// s 表示 yolov5s 模型

    string outputfilename = "cls.engine";//输出
    string engine = std::string("cls.wts");//输入
    _yolov5cls.createngine(engine,outputfilename,'s');// s 表示 yolov5s 模型
}
进行预测的使用方法
#include "yolov5det.h"
#include "yolov5cls.h"

#include "opencv2/imgcodecs.hpp"

using namespace std;
using namespace cv;

int main(int argc, char** argv) {
    yolov5det _yolov5det;
    yolov5cls _yolov5cls;
    clock_t starttime, endtime;

    string enginedet = "best.engine";
    _yolov5det.setengine(enginedet);//设置模型
    _yolov5det.kConfThresh = 0.75;//设置kConfThresh参数
    _yolov5det.kNmsThresh = 0.35;//设置kNmsThresh参数


    Mat img_det = imread("det.bmp",IMREAD_COLOR); //导入图片
    starttime = clock();
    std::vector<std::vector<Detection>> res_batch = _yolov5det.detect(img_det); //预测
    endtime = clock();
    cout << (double)(endtime - starttime) << endl;

    if(res_batch.size()>0){
        for(int n =0;n<res_batch[0].size();n++){//res_batch[0] 测试的模型输入只有1张图片
            cout<<res_batch[0][n].bbox[3]<<endl;//res_batch[0][n] 的属性里有box的位置,分类,分值等信息
            cout<<res_batch[0][n].bbox[2]<<endl;
        }
    }


    string enginecls = "cls.engine";
    _yolov5cls.setengine(enginecls);//设置模型

    Mat img_cls = imread("cls.bmp",IMREAD_COLOR);
    starttime = clock();
    std::vector<std::vector<int>> res_batch = _yolov5cls.detect(img_cls);
    endtime = clock();
    cout << (double)(endtime - starttime) << endl;

    if(res_batch.size()>0){
        cout<<"classid:"<<res_batch[0][0]<<endl;// 分类的id
    }
}