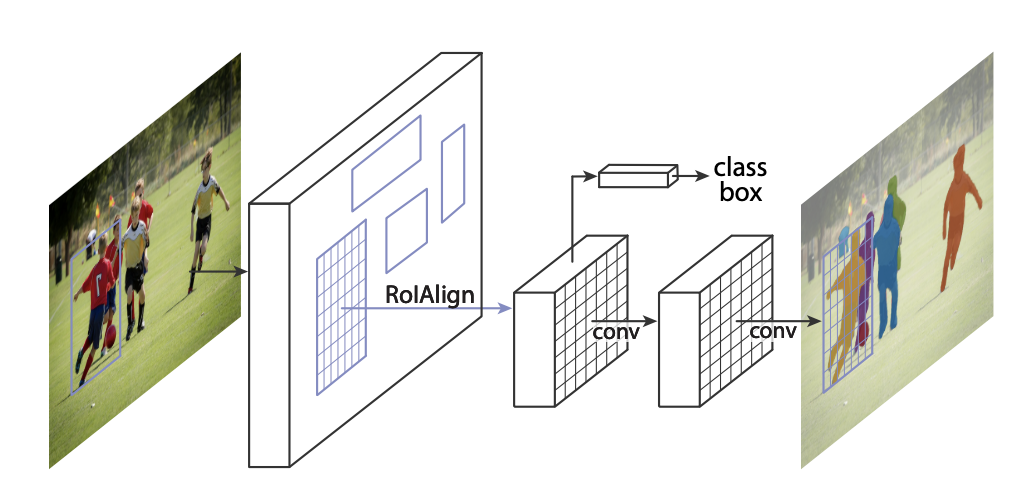
网上可以找到许多TensorFlow的Mask-RCNN版本,现以github上一个Star较多的版本为例,介绍如何在C#中部署Mask-RCNN模型
一.前期准备
1.同步Mask-RCNN的代码,地址为 https://github.com/matterport/Mask_RCNN.git
2.训练模型:
可以使用jupyter打开samples文件夹下的例子进行训练,也可以参考其例子训练自己的模型。目标是生存保存好权重的模型文件。模型每训练一个epochs 会在 model_dir=MODEL_DIR 设置好的文件夹下留下模型文件。具体训练方法就不累述了~~~
3.在VS里使用Nuget,给项目添加OpencvSharp 与 TensorflowSharp
二.生成TensorflowSharp 可以调用的pb文件
C#中 TensorflowSharp可以导入PB模型(估计H5文件也是可以的,就不研究了),所以先要通过训练好的模型文件,生成pb文件,并找到input 与 output 节点和节点的大小,纬度,值等信息
1.github上作者对代码进行了大量封装,建立了不少类,直接使用其python代码是不可以的。具体方法看下面生成pb文件的代码
from mrcnn.config import Config
from keras import backend as k
from tensorflow.python.framework.graph_util_impl import convert_variables_to_constants
import tensorflow as tf
import mrcnn.model as modellib
import os

class outConfig(Config):
    NAME = "ocr"                #名字
    NUM_CLASSES = 1 + 2          #背景 + 分类数量
    BACKBONE = "resnet50"        #使用何种网络
    IMAGE_MIN_DIM = 128          #图片大小设在成固定值128*128
    IMAGE_MAX_DIM = 128
    GPU_COUNT = 1               #gpu数量
    IMAGES_PER_GPU = 3           #每次预测3张图片
    DETECTION_MAX_INSTANCES = 2   #一张图上最多找到2个实例

ROOT_DIR = os.path.abspath("")
MODEL_DIR = os.path.join(ROOT_DIR, "logs") #模型保存的文件夹
out_config = outConfig()
out_config.display()

model = modellib.MaskRCNN(mode="inference", config=out_config,model_dir=MODEL_DIR) #生存MaskRCNN类
model_path = model.find_last()   #最后一次训练的模型路径
model.load_weights(model_path, by_name=True)  #导入权重

print(model.keras_model.inputs)   #输出 网络的inputs
print(model.keras_model.outputs)  #输出 网络的outputs
session = k.get_session()
min_graph = convert_variables_to_constants(session,session.graph_def,[out.op.name for out in model.keras_model.outputs])
tf.train.write_graph(min_graph, './', 'mrcnn.pb', as_text=False) #保存权重文件
输出:
[<tf.Tensor 'input_image:0' shape=(?, ?, ?, 3) dtype=float32>, <tf.Tensor 'input_image_meta:0' shape=(?, 15) dtype=float32>, <tf.Tensor 'input_anchors:0' shape=(?, ?, 4) dtype=float32>]
[<tf.Tensor 'mrcnn_detection/Reshape_3:0' shape=(3, 2, 6) dtype=float32>, <tf.Tensor 'mrcnn_class/Reshape_1:0' shape=(?, 1000, 3) dtype=float32>, <tf.Tensor 'mrcnn_bbox/Reshape:0' shape=(?, 1000, 3, 4) dtype=float32>, <tf.Tensor 'mrcnn_mask/Reshape_1:0' shape=(3, 2, 28, 28, 3) dtype=float32>, <tf.Tensor 'ROI/packed_2:0' shape=(3, ?, 4) dtype=float32>, <tf.Tensor 'rpn_class/concat:0' shape=(?, ?, 2) dtype=float32>, <tf.Tensor 'rpn_bbox/concat:0' shape=(?, ?, 4) dtype=float32>]
inputs 有3个,第一个是图片比较好填,另外2个参数是通过图片大小与锚点的大小多少计算出来的。为简化,这里就使用固定图片大小和锚的方法来做,直接输入固定值。值的获取方法下面再介绍
outputs有5个,第一个比较有用,有三个维度。上面的例子里是 ” shape=(3, 2, 6) “。第一个纬度是图片数量,第二个纬度是一张图上最多找出的实例个数,第三个纬度是找出的实例的信息。6个值代表啥后面再解释
三.获取input_image_meta,input_anchors
1.编辑mrcnn/model.py 文件 在大约2580行前面添加以下代码
print(anchors.shape)
print(image_metas)
anchors.tofile('anchor.data')
detections, _, _, mrcnn_mask, _, _, _ =\
            self.keras_model.predict([molded_images, image_metas, anchors], verbose=0)
在上面保存pb文件的后面添加上
import cv2
img = cv2.imread("test.bmp")
img = cv2.resize(img,(128,128),0,0,cv2.INTER_AREA)
results = model.detect([img,img,img], verbose=1)
重新运行输出中会看到下面一段
(3, 4092, 4)
[[  0 128 128   3 128 128   3   0   0 128 128   1   0   0   0]
 [  0 128 128   3 128 128   3   0   0 128 128   1   0   0   0]
 [  0 128 128   3 128 128   3   0   0 128 128   1   0   0   0]]
这个就是 anchor的shape大小 和input_image_meta的值
在项目文件夹下还会生成一个anchor.data ,这个就算锚的值
四.在C#中整合以上内容,进行预测
整合后的代码如下:
String pb_filename = "mrcnn.pb"; //pb文件名

TFGraph graph = new TFGraph();
graph.Import(File.ReadAllBytes(pb_filename)); // 导入pb文件

TFSession session = new TFSession(graph); // 新建session

List<TFOutput> l_inputs = new List<TFOutput>(), l_outputs = new List<TFOutput>();
l_inputs.Add(graph["input_image"][0]);       //设置input 一共有3个
l_inputs.Add(graph["input_image_meta"][0]);
l_inputs.Add(graph["input_anchors"][0]);
l_outputs.Add(graph["mrcnn_detection/Reshape_3"][0]);  //设置output

TFOutput[] inputs = l_inputs.ToArray();    //转换为TFOutput session.Run时的输入
TFOutput[] outputs = l_outputs.ToArray();

int mrcnn_img_lenth = 3;   //一次预测的图片数
byte[] temp_byte = new byte[4092* 4 *4 * mrcnn_img_lenth]; //初始化anchor.data byte数组
File.Open("anchor.data",FileMode.Open).Read(temp_byte,0, temp_byte.Length);
float[] temp_float = new float[4092* 4 * mrcnn_img_lenth]; //初始化anchor float数组
Buffer.BlockCopy(temp_byte, 0, temp_float, 0, temp_byte.Length); // 复制数据
TFTensor t_anchor = TFTensor.FromBuffer(new TFShape(mrcnn_img_lenth, 4092, 4), temp_float, 0, temp_float.Length); // 生成anchor锚数据

float[] input_meta_one = { 0, 128, 128, 3, 128, 128, 3, 0, 0, 128, 128, 1, 0, 0, 0 }; //根据python中的输出进行初始化

float[] input_meta = new float[input_meta_one.Length * mrcnn_img_lenth];
for (int n = 0; n < mrcnn_img_lenth; n++) {
	Array.Copy(input_meta_one, 0, input_meta, n * input_meta_one.Length, input_meta_one.Length);
}
TFTensor t_input_meta = TFTensor.FromBuffer(new TFShape(mrcnn_img_lenth, input_meta_one.Length), input_meta, 0, input_meta.Length); // 生成input_meta 数据

List<Mat> _mats = new List<Mat>();
Stirng img_filename = "test.bmp";
Mat img = Cv2.ImRead(img_filename);
for (int n = 0; n < mrcnn_img_lenth; n++) {
	Mat temp = new Mat();
	Cv2.Resize(img, temp, new Size(128, 128));
	_mats.Add(temp);
} // 初始化3张图片,并resize到128 × 128

float[] data = new float[mrcnn_img_lenth * 128 * 128 * 3];
for (int i = 0; i < mrcnn_img_lenth; i++) {
	Mat t_f = new Mat();
	_mats[i].ConvertTo(t_f, MatType.CV_32FC3);
	t_f = t_f - new Scalar(123.7, 116.8, 103.9);
	Marshal.Copy(t_f.Data, data, i * 128 * 128 * 3, 128 * 128 * 3);
} // 将图片转换为float类型 并减去均值(mrcnn算法中有减均值这一步)

TFTensor t_input = TFTensor.FromBuffer(new TFShape(mrcnn_img_lenth, w, h, 3), data, 0, data.Length); // 生成input_image 数据
List<TFTensor> inputValues = new List<TFTensor>();
inputValues.Add(t_input);
inputValues.Add(t_input_meta);
inputValues.Add(t_anchor); // 合并input输入

var output = session.Run(inputs, inputValues.ToArray(), outputs); //进行预测
TFTensor result = output[0];
float[] r_temp = new float[mrcnn_img_lenth * 2 * 6];
Marshal.Copy(result.Data, r_temp, 0, r_temp.Length); // 将输出转化为float数组

///假如第一张图找到了一个目标 6个值,前面4个是坐标信息 第5个是分类 第6个是该分类的概率
int p1x, p1y, p2x, p2y;
p1x = (int)(128 * r_temp[1]); // 前面2个是左上角坐标,先y 后 x
p1y = (int)(128 * r_temp[0]);
p2x = (int)(128 * r_temp[3]); // 后面2个是右下角坐标,先y 后 x
p2y = (int)(128 * r_temp[2]);

Console.WriteLine(r_temp[4]); // 分类
Console.WriteLine(r_temp[5]); // 概率

Cv2.Rectangle(_mats[0], new Point(p1x, p1y), new Point(p2x, p2y), new Scalar(255)); // 画出来看看
Cv2.ImWrite("test_mrcnn.bmp", _mats[0]);
代码最后一段做了省略,可以根据图片的多少和需要进行修改。
